Our plugin seamlessly integrates all your listing data into your website to generate natural language URL structure for all of your Properties and Property search. All of these URLs are indexed in Google through Yoast SEO integration giving your properties, property search and brand top Google search results. URL Structure includes:
- Property Name
- Property Address
- Property Type
- Property Sub-Type
- Property Use Type
- State
- City
- Market
- Sub-Market
- Zip Code
- Team Member
All property information variables are grouped together and structured so a URL can include location, property type, category in natural language URLs giving you the most powerful brand equity building tool on the market through top of the page search Google search results.
Click the Try for Free button above and we will send you a CRE website and a CRE inventory management system in a couple of business days at no cost.
Once sent, we will set up a call to walk you through everything and answer questions you have.
Everything a commercial real estate company would need:
- Property Search & Property Pages
- Electronic CA/Data Rooms
- Team Members
- Media (News, Blogs, Press Releases, Client Experiences, etc.)
- Services
- Client Logos
- Admin Members
- Property Email Marketing
- Contacts
- Lead Generation forms
- Transactions/Comps
- Leases/Renewal Reports & Alerts
- Work Orders/Maintenance Requests
The plugin provides short codes that make it simple to integrate any Elementor Form as well as an encryption key to securely integrate into your CRM Contact Database.
Inbound leads can be segmented to ensure your contact database is structured to support downstream email marketing.
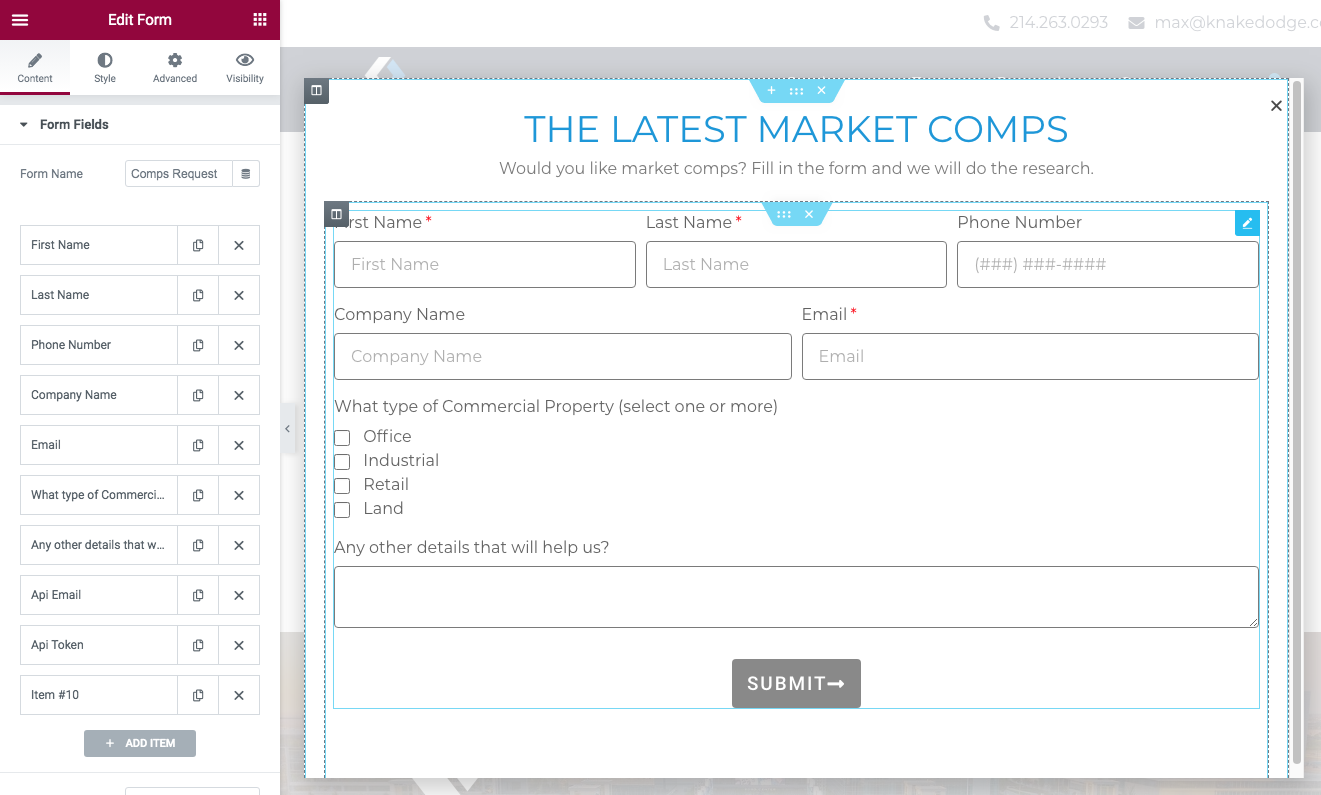
Elementor Form Field Configurations:
Fields:
- Form Name – This is the name that will display in the subject line of the email alert notification, the Contact Event that is created when a submitted and the name that can be used in ‘Alert Notifications’ to associate other Admin users to receive the Email Alert Notification (in addition to all Super Admin users)
- first_name – [field id=”first_name”]
- last_name – [field id=”last_name”]
- email_work – [field id=”email_work”]
- phone_work – [field id=”phone_work”]
- company_name – [field id=”company_name”]
- description – [field id=”description”]
One or more (Array) select drop downs or checkboxes
- contact_types – [field id=”contact_types”]
- tenant_types – [field id=”tenant_types”]
- client_types – [field id=”client_types”]
- markets – [field id=”markets”]
- property_types – [field id=”property_types”]
Form Integration and security settings:
1. API EMAIL – Username: Form Field “Hidden” with:
- Default Value = [CRECS Super Admin Username]
- ID = “email”
- Shortcode = [field id=”email”]
2. API Token – Username: Form Field “Hidden” with:
- Default Value = [CRECS Super Admin Token found in Admin Account]
- ID = “user_token”
- Shortcode = [field id=”user_token”]
3. Item #10 = Content = reCAPTCHA
4. Action After Submit = Webhook, Popup
5. Popup
- Action = Close Popup
6. Webhook
- Webhook URL: https://[CRECS Admin Domain]/api/v1/custom_form
- Advanced Data = Yes
Notification email alerts:
To set up an email alert when a form is submitted follow these steps…
- In the Admin open CRM / Alert Notification (top nav)
- Click the ‘New Alert Notification’
- Enter/select the following
- Name = The ‘Form Name‘ of the Elementor form. This is found at the top of Edit Form under ‘Form Fields’. This links the too together.
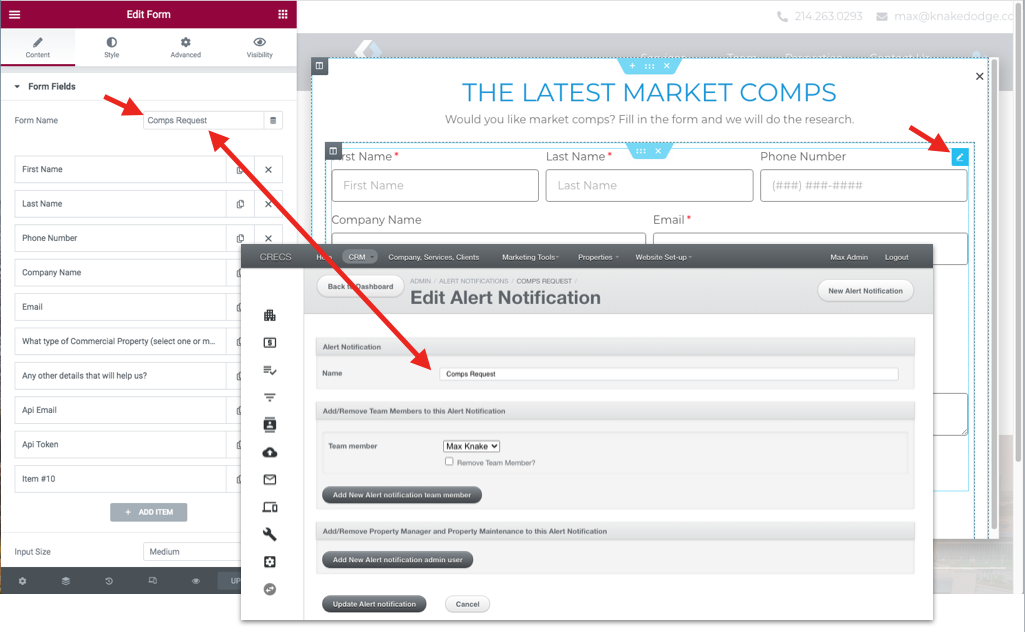
- Add Team Members or Property Managers you’d like the email alert to be sent to.
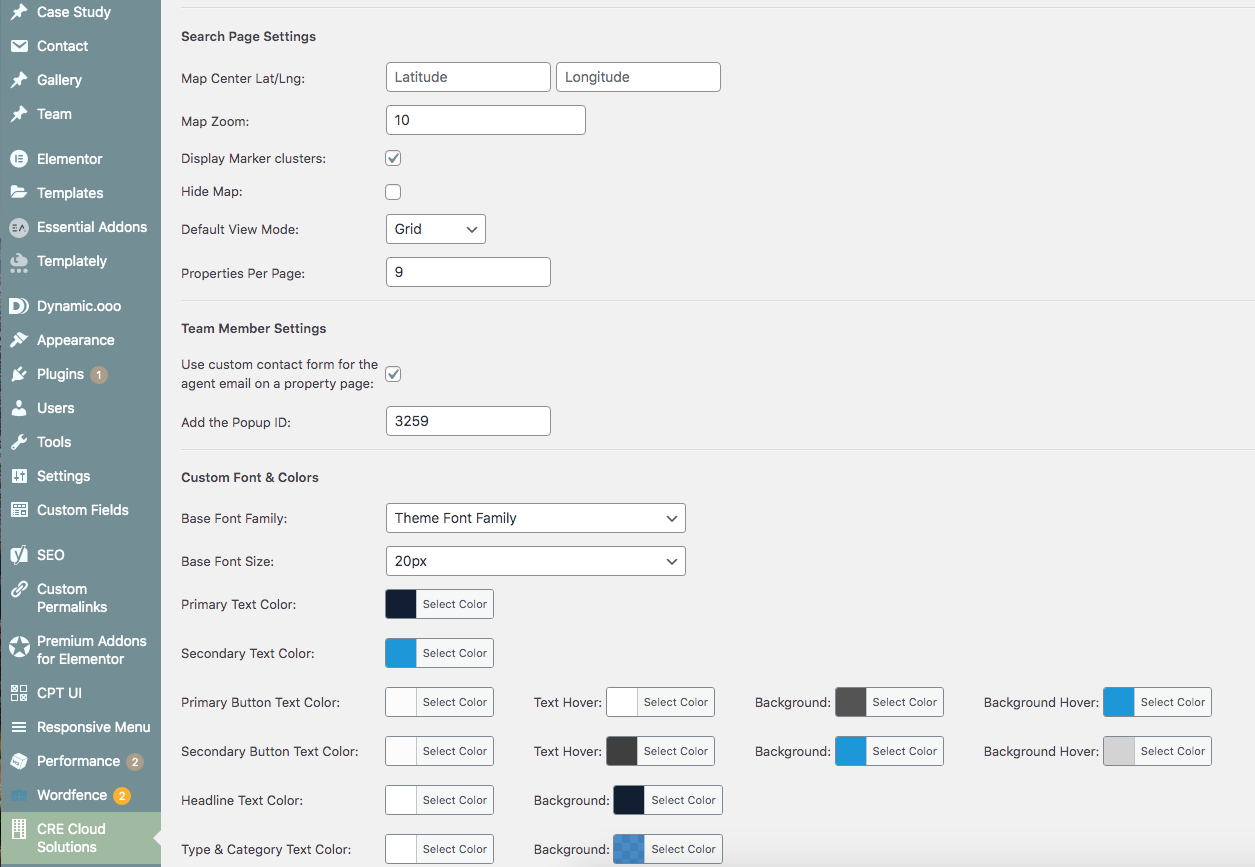
Yes. The plugin allows you to set up the following:
- Map center and zoom level latitude & longitude
- Map clustering count & non-clustering
- Search page layout
- Map & List View
- Map & Grid View
- List View
- Grid View
- Font Family and size
- Text colors
- Banner colors and opacity
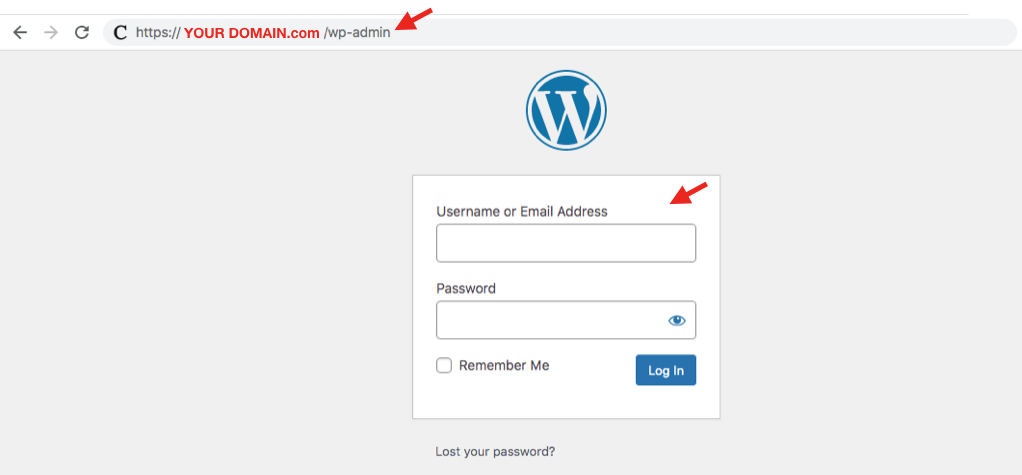
Login to the WordPress/Elementor Admin to manage your website.
STEPS
- Open your website home page and add “/wp-admin” to the end of the URL in the address bar.
- Enter the WordPress Admin’s username and password and click the “Log In” button.
From the Elementor edit page the CRE Cloud Solutions Properties Grid Widget can be added and configured in any section of the page.
STEPS
- First login to the Word Press Admin from your domain/URL be adding “/wp-admin”
- Once logged into the WP Admin, go to the page you would like to add the Properties Widget and add a section.
- Next, click on the Elementor Widget menu (top-right of the Elementor section) and navigate to the CRECS General section.
- Drag and drop the Properties Grid Widget into the section.
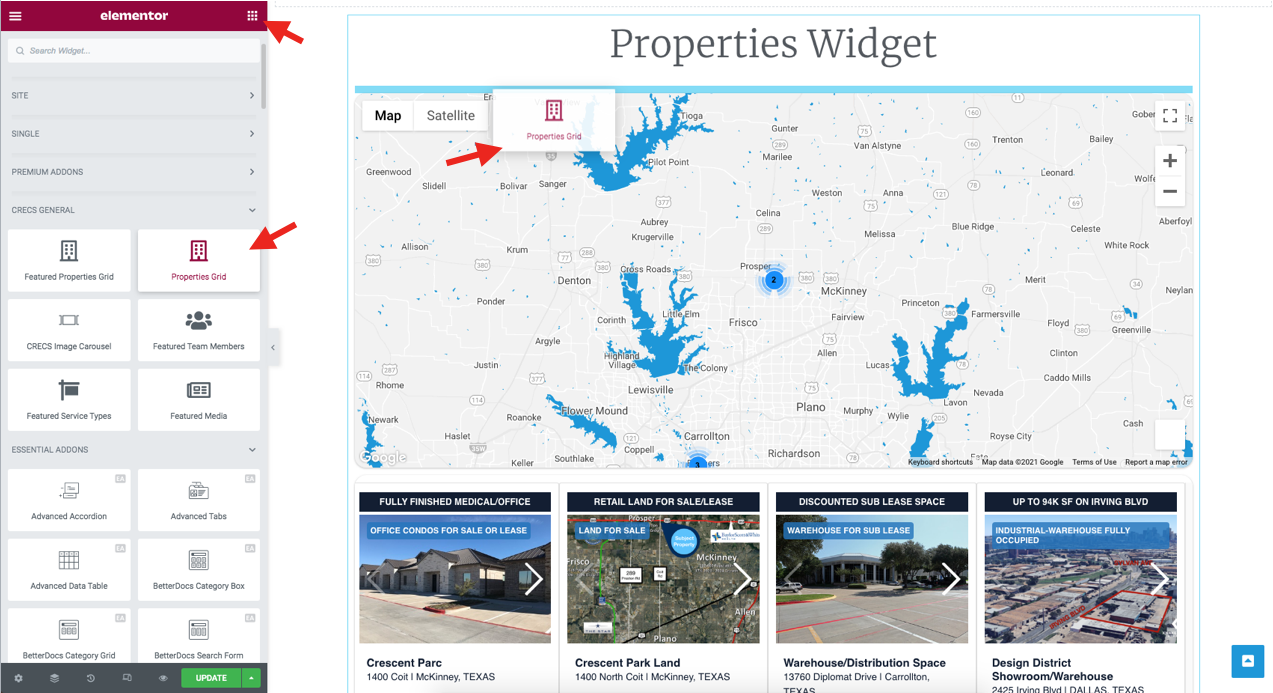
- Next, configure the layout and filters the Properties Grid Widget includes. Once done, click the Update button to publish the changes.
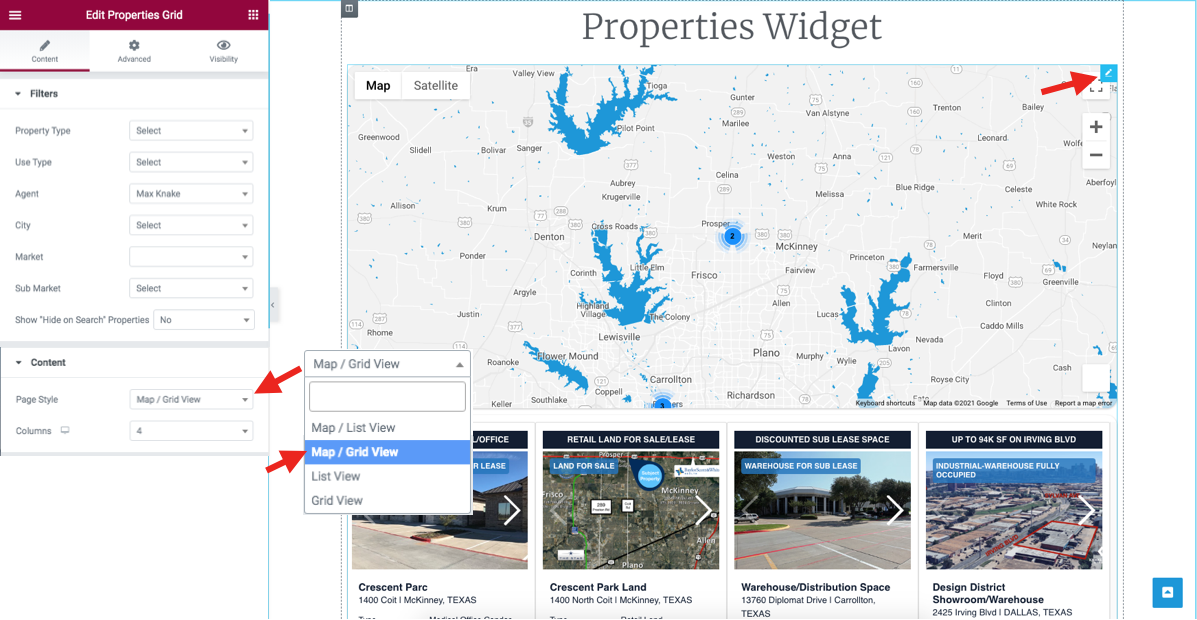
The Properties Grid Widget can display in the following layouts:
- Map + Grid (Grid columns are responsive customizable)
- Map + List View
- Grid View (Grid columns are responsive customizable)
- List View
Steps to change the layout
- Click the Edit pen in the top-right corner of the Properties Grid Widget.
- In the Content section of the Edit Properties Grid select the layout from the Page Style. IMPORTANT: If Grid view is chosen be sure to select the Columns for each responsive view (Desktop, Tablet and Mobile).
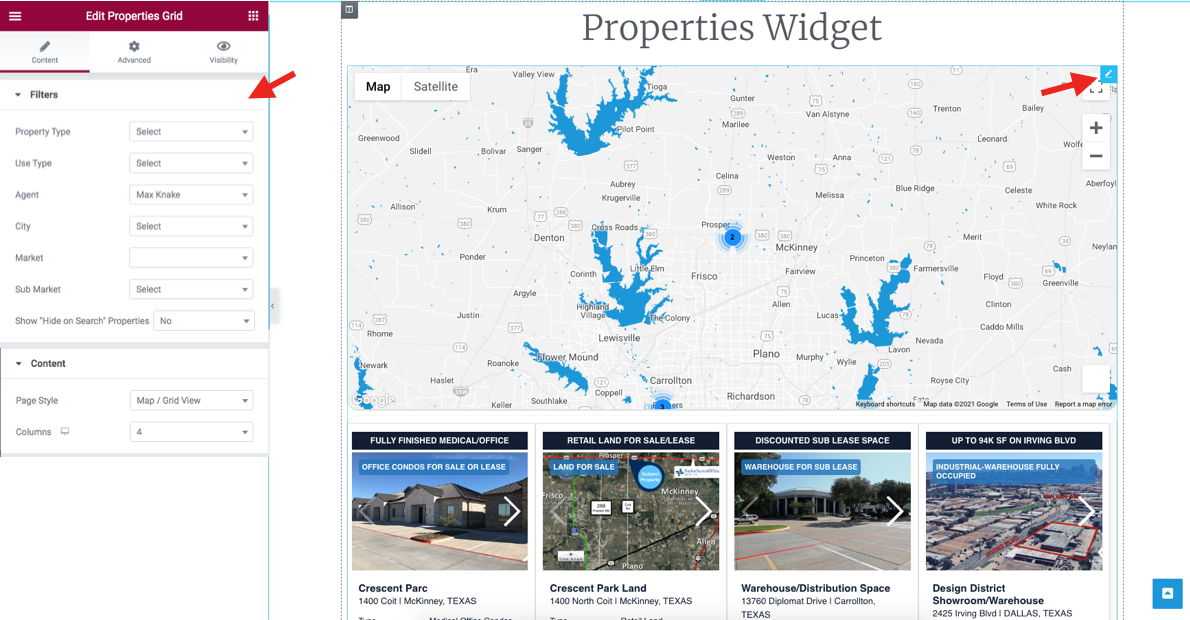
Can I filter the properties to display on certain pages like Team Member, Service, Market or others?
Yes. In some cases you may want to display Properties on specific pages. The Properties Grid Widget can be filter by the one or more of the following:
- Property Type
- Use Type
- Agent/Team Member
- City
- Market
- Sub-Market
Steps to Filter Results
- Click the Edit pen in the top-right corner of the Widget.
- In the Filters section of the Edit Properties Grid you are able to select one or more of the filters and the property display results will update.
- Once done, click the Update button to publish the changes.
From the Elementor edit page. The CRE Cloud Solutions Featured Properties Widget can be added and configured in a grid or carousel view.
STEPS
- First login to the Word Press Admin from your domain/URL be adding “/wp-admin”
- Once logged into the WP Admin, go to the page you would like to add the Media Widget and add a section.
- Next, click on the Elementor Widget menu (top-right of the Elementor section) and navigate to the CRECS General section.
- Drag and drop the Featured Properties Widget into the section.
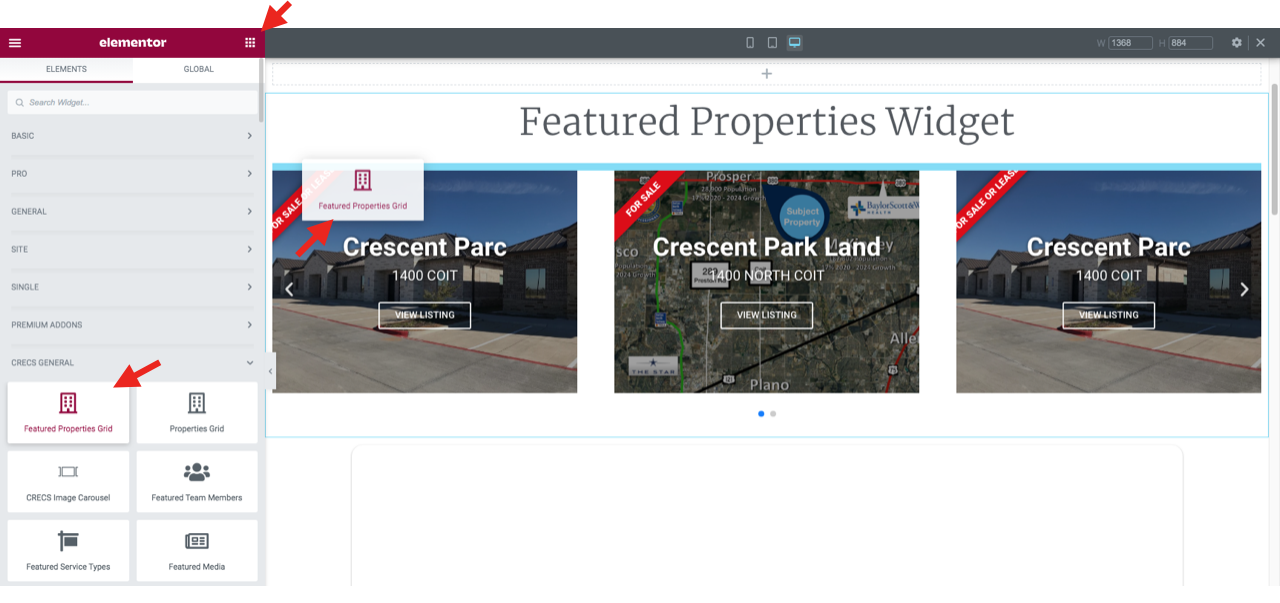
- Next, configure the layout, styling, and other options the Featured Properties Widget includes. Once done, click the Update button to publish the changes.
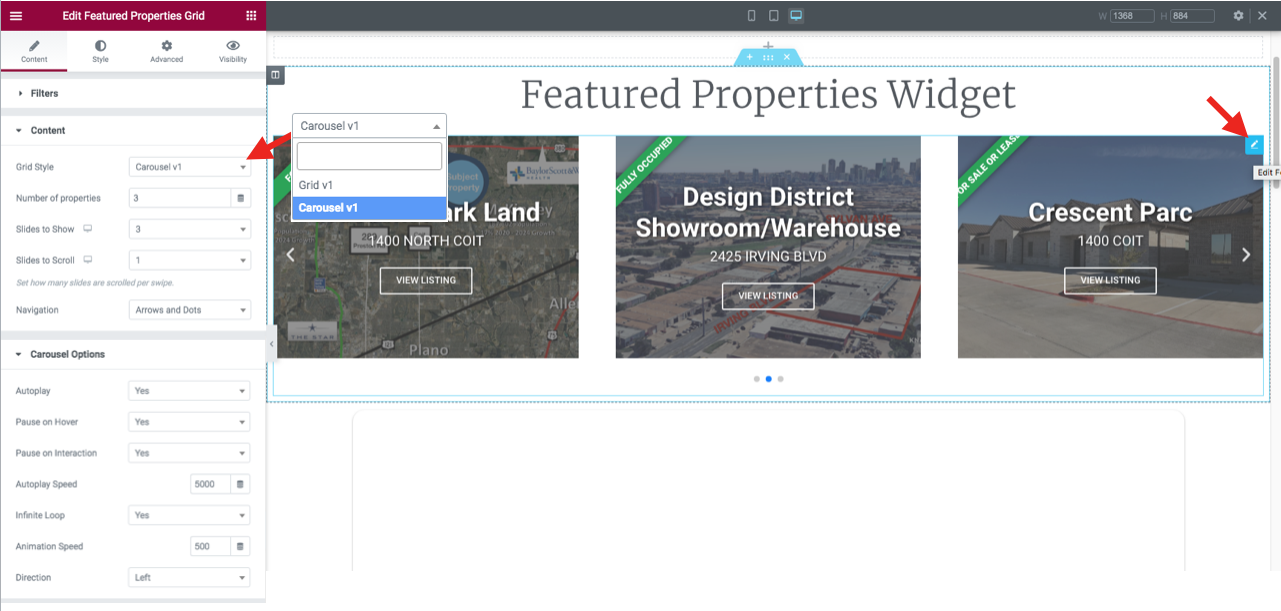
The Featured Properties Widget can display in a column grid view or a carousel view based on how you would like it to display on your page or pages.
Carousel View
- Click the Edit pen in the top-right corner of the Widget.
- In the Content section of the Edit Featured Properties select Carousel v1. This will display the Featured Properties in a column carousel view where the column numbers and display setting can be set for each view.
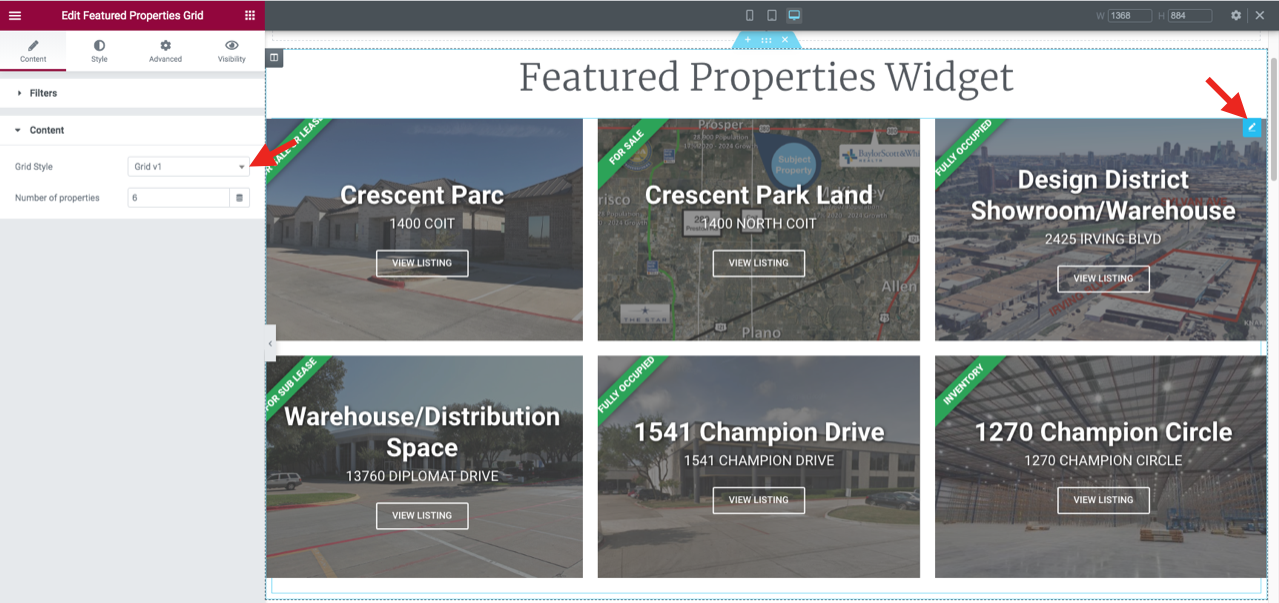
Grid View
- In the Content section of the Edit Featured Properties select Grid v1. This will display the Featured Properties in a 3 column responsive grid view.
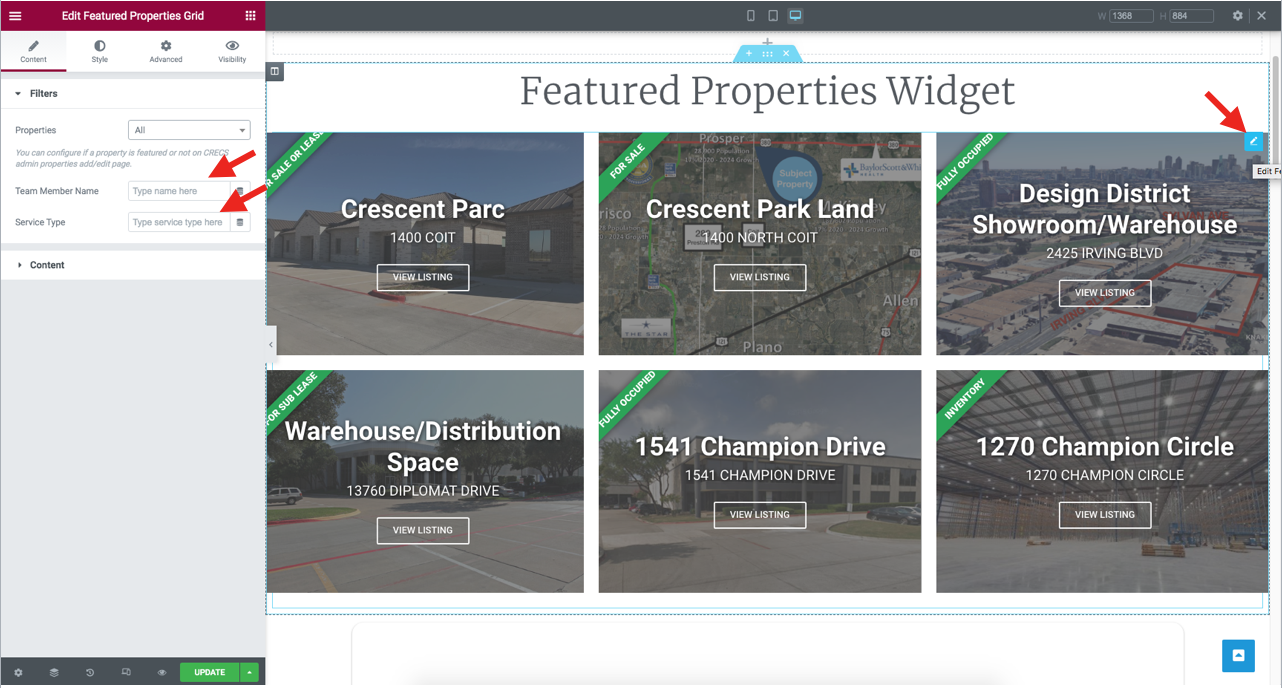
Yes. In some cases you may want to display Featured Properties only associated with a Team member and/or Service . For example, if you wanted to display Featured Properties on a Team Member page or Service Type page, you would just apply the filters to the widget.
Filtering Steps
- Click the Edit pen in the top-right corner of the Widget.
- In the Filters section of the Edit Featured Properties Grid in the Team Member Name and/or Service Type box you can enter the associated name.
- Once done, click the Update button to publish the changes.
As part of our services we provide our Commercial Real Estate inventory management system. In this system anyone on your team can login (unlimited users) and add/edit/manage properties (unlimited properties).
STEPS
- Login to you CRE Cloud Solutions Admin
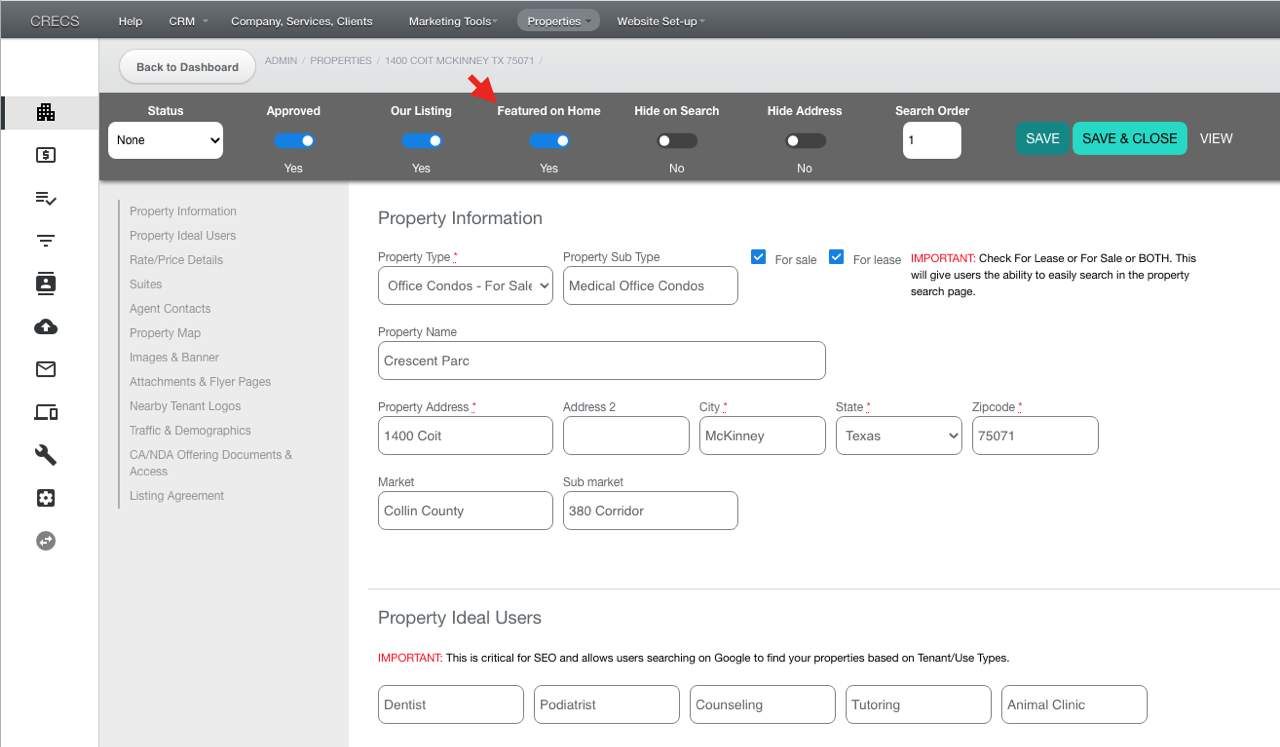
- Goto: Properties > Edit Property
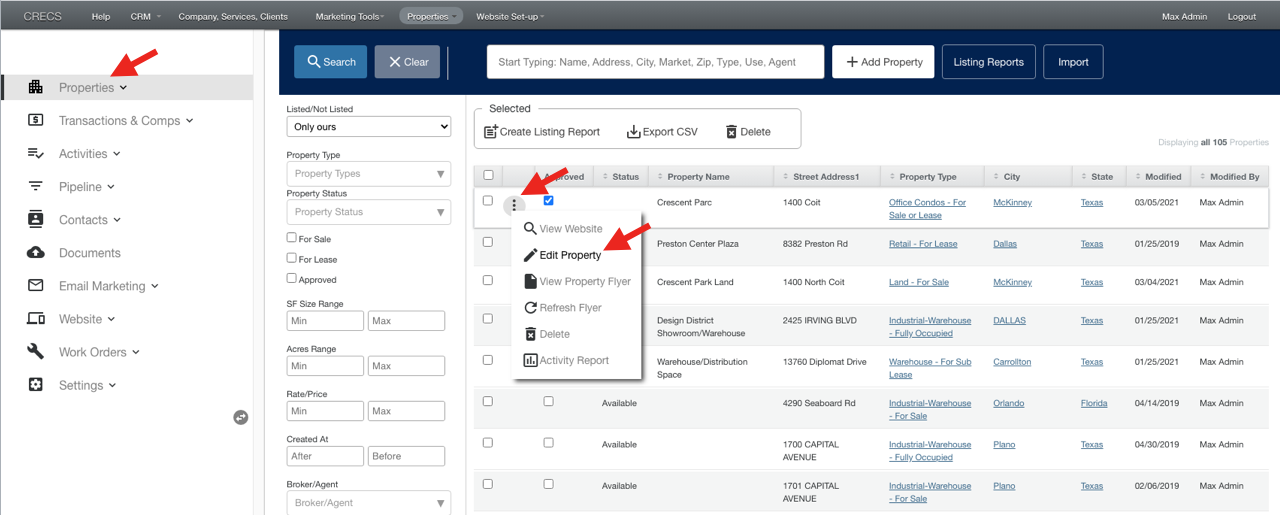
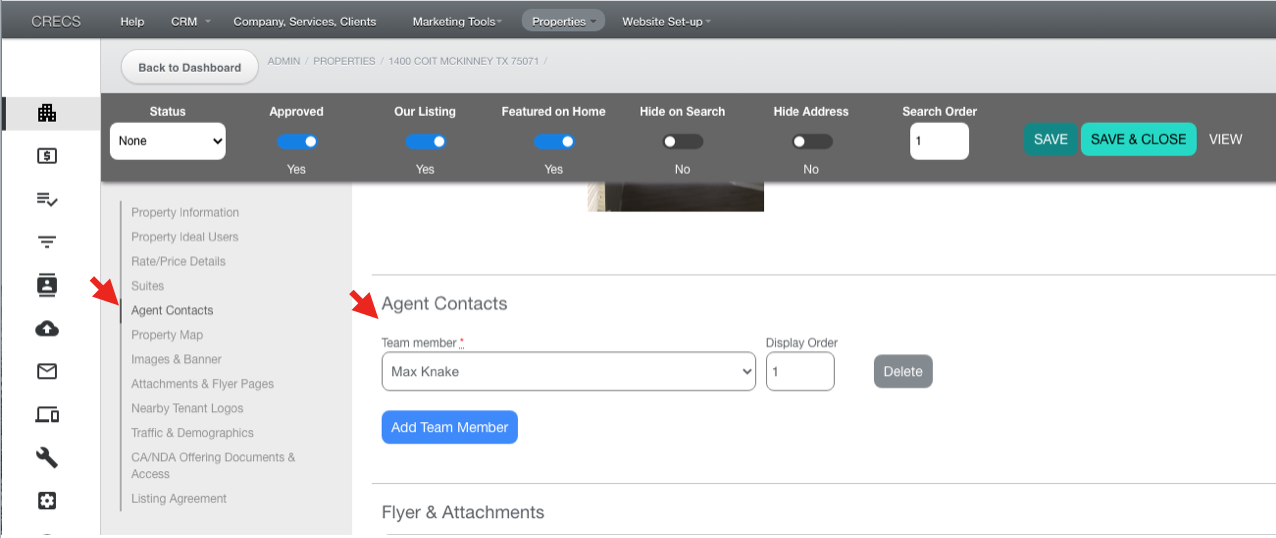
- From the Edit Property page you can Feature the property as well as add one or more Team members
From the Elementor edit page. The CRE Cloud Solutions Media Widget can be added and configured in a grid or carousel view.
STEPS
- First login to the Word Press Admin from your domain/URL be adding “/wp-admin”
- Once logged into the WP Admin, go to the page you would like to add the Team Member Widget and add a section.
- Next, click on the Elementor Widget menu (top-right of the Elementor section) and navigate to the CRECS General section.
- Drag and drop the Featured Team Members Widget into the section.
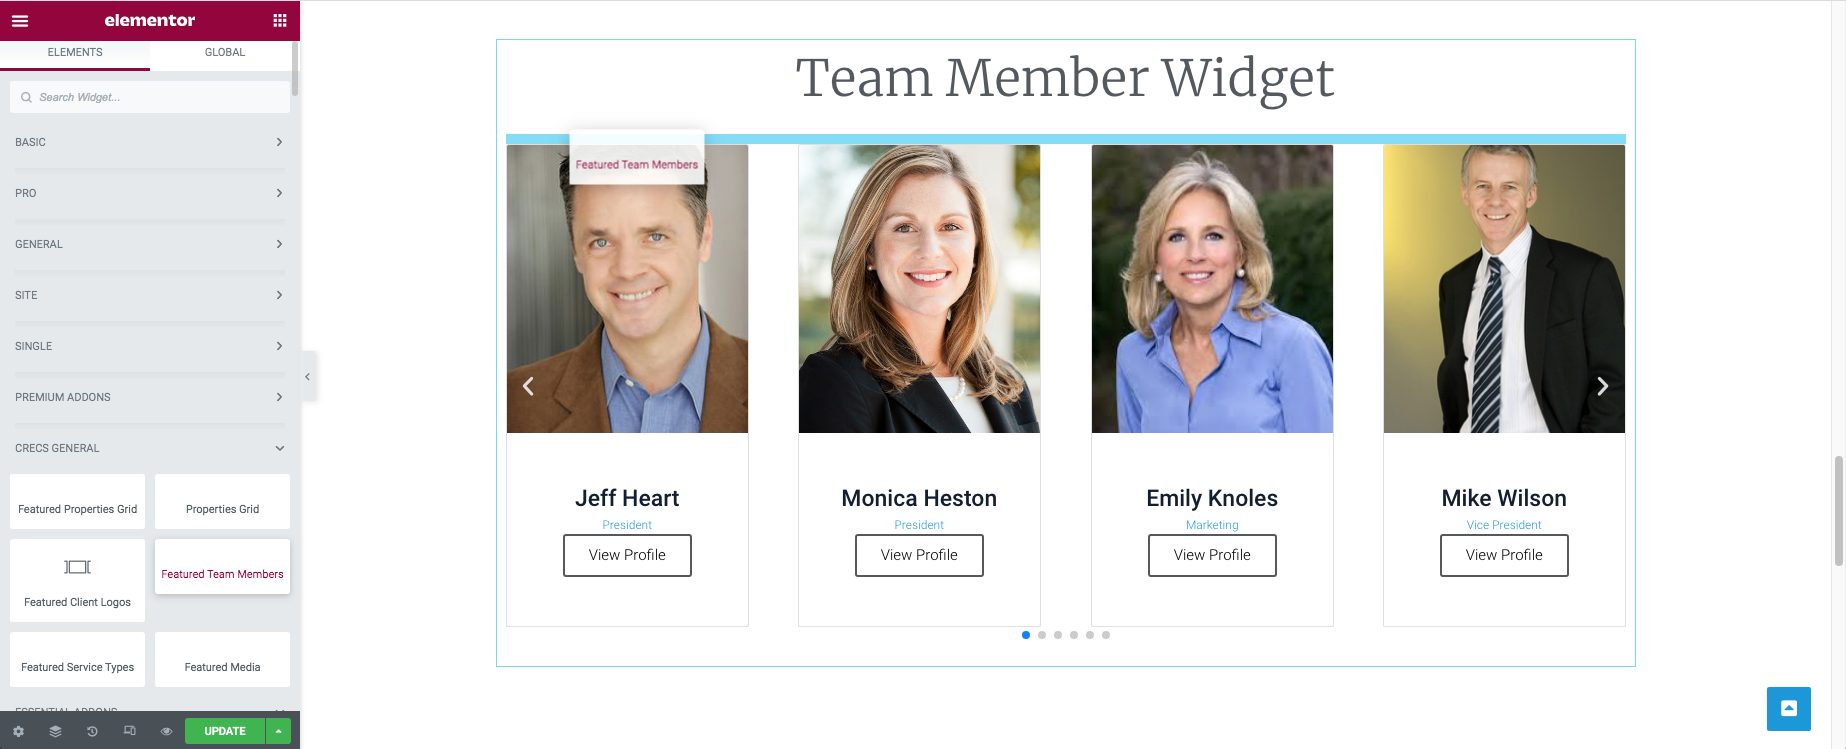
- Next, configure the layout, styling, and other options the Feature Team Members Widget includes. Once done, click the Update button to publish the changes.
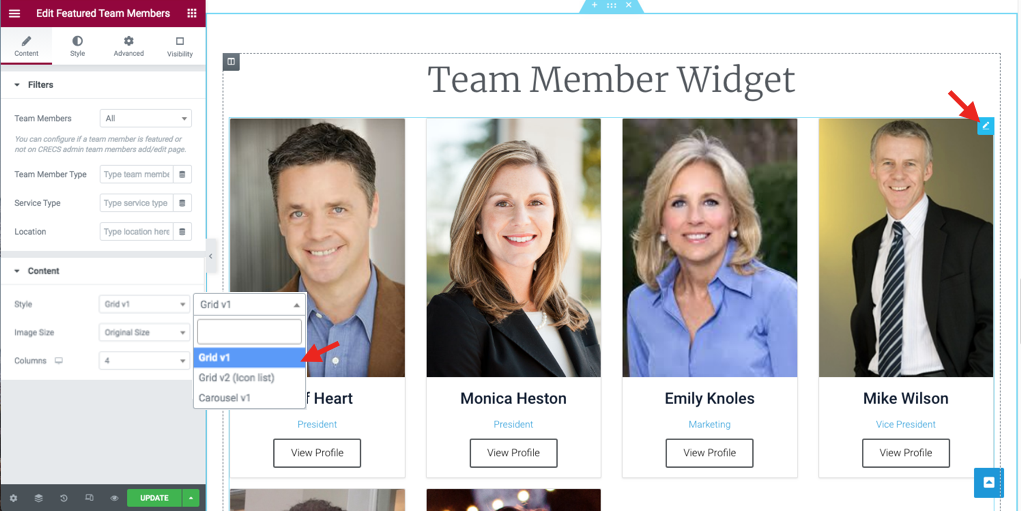
The Featured Team Members Widget can be displayed in the following views:
- Grid v1
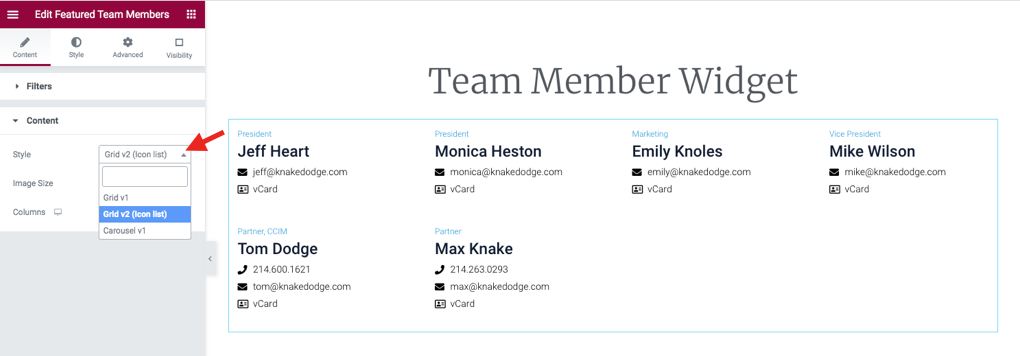
- Grid v2 (Icon List) – This does not display headshot images
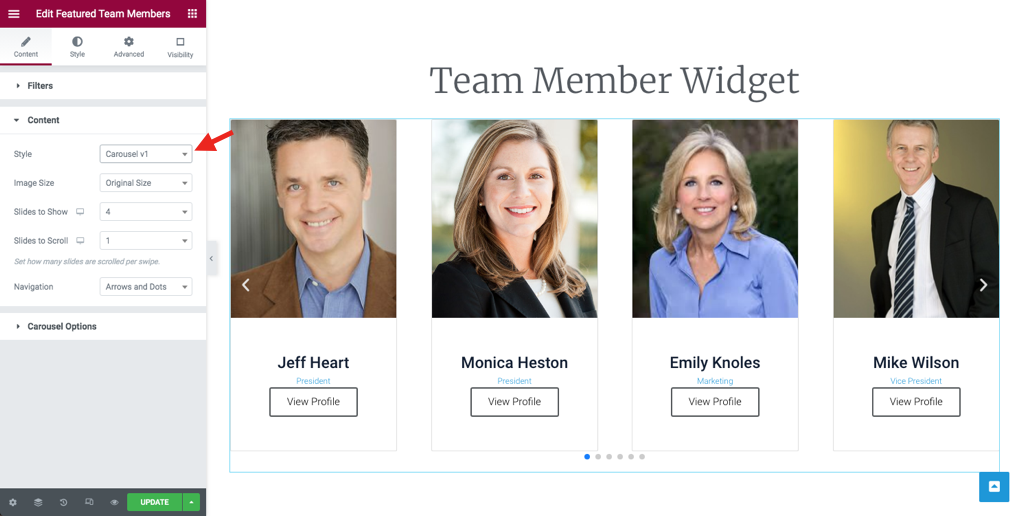
- Carousel v1
Grid v1V
- Click the Edit pen in the top-right corner of the Widget.
- In the Content section of the Edit Featured Team Members select Grid v1. This will display the Team Members in a column grid view where the column numbers can be set for each view.
Grid v2 (Icon List)
- In the Content section of the Edit Featured Team Members select Grid v2 (Icon List). This will display the Team Members WITHOUT the headshot in a grid view where the column numbers can be configured.
Carousel View
- In the Content section of the Edit Featured Team Members select Carousel v1. This will display the Media in a carousel view where the column numbers and how it plays can be configured.
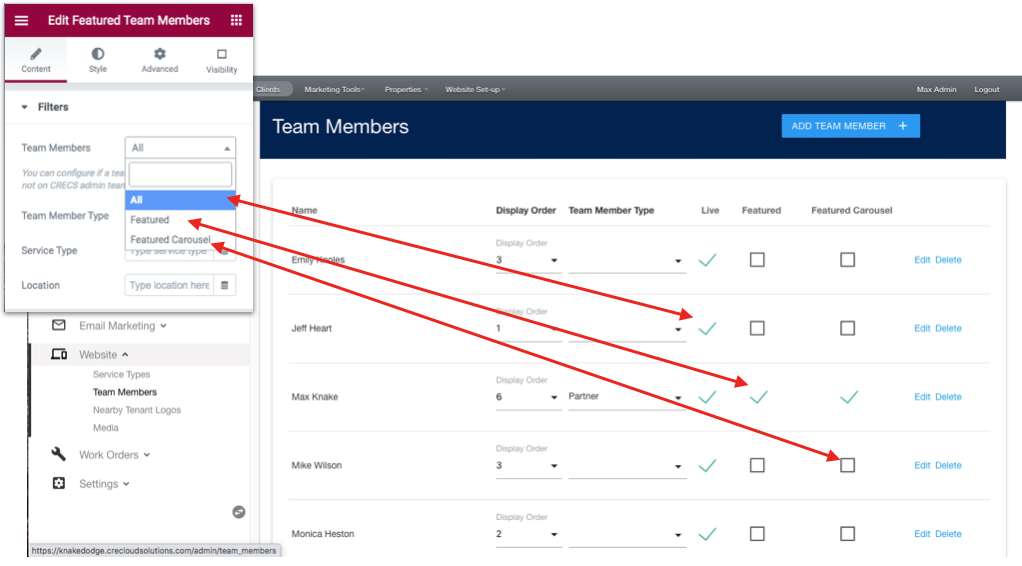
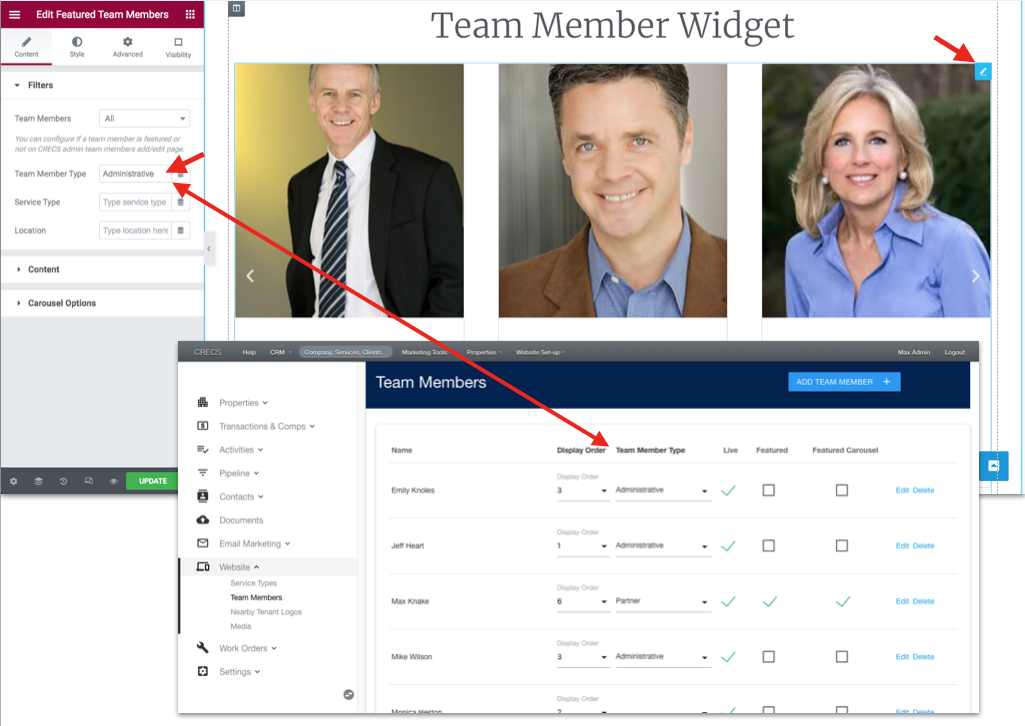
The Featured Team Member Widget can display All, Featured or Featured Carousel team members based on the filter selected.
STEPS
- Click the Edit pen in the top-right corner of the Widget.
- In the Filters section of the Edit Featured Team Members you can select ALL, Featured or Featured Carousel.
- Once done, click the Update button to publish the changes.
In some cases you may want to display Team Members only associated with a Team Member Type. For example, you may want to display one or more Team Members in a sidebar section on a page.
STEPS
- Click the Edit pen in the top-right corner of the Widget.
- In the Filters section of the Edit Featured Team Member in the Team Member Type box you can enter the name or the Team Member Type.
- Once done, click the Update button to publish the changes.
Adding Team Member Types
- Goto: Companies, Service, Clients (Top-menu) / Team Member Types
- Click the “New Team Member Type” button on the top-right
- Add and Save
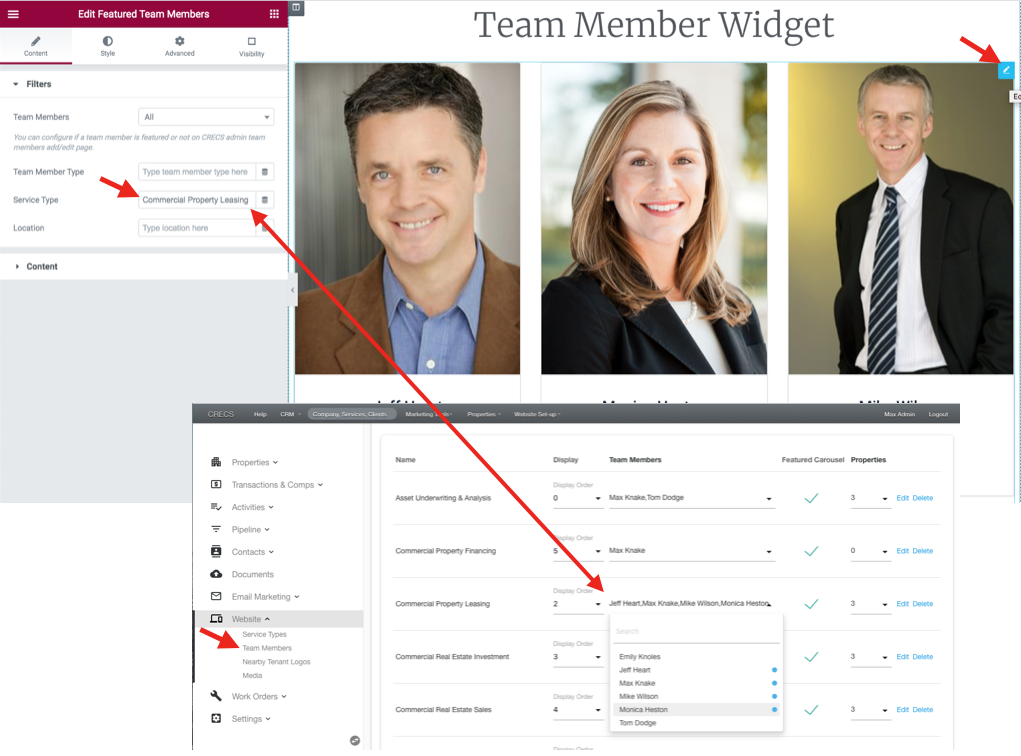
In some cases you may want to display Team Members only associated with a Service Type. For example, on Service Type pages you may want to display one or more Team Members in a sidebar section on a page as the contacts.
STEPS
- Click the Edit pen in the top-right corner of the Widget.
- In the Filters section of the Edit Featured Team Member in the Service Type box you can enter the name or the Service Type.
- Once done, click the Update button to publish the changes.
From the Elementor edit page. The CRE Cloud Solutions Media Widget can be added and configured in a grid or carousel view.
STEPS
- First login to the Word Press Admin from your domain/URL be adding “/wp-admin”
- Once logged into the WP Admin, go to the page you would like to add the Media Widget and add a section.
- Next, click on the Elementor Widget menu (top-right of the Elementor section) and navigate to the CRECS General section.
- Drag and drop the Featured Media Widget into the section.
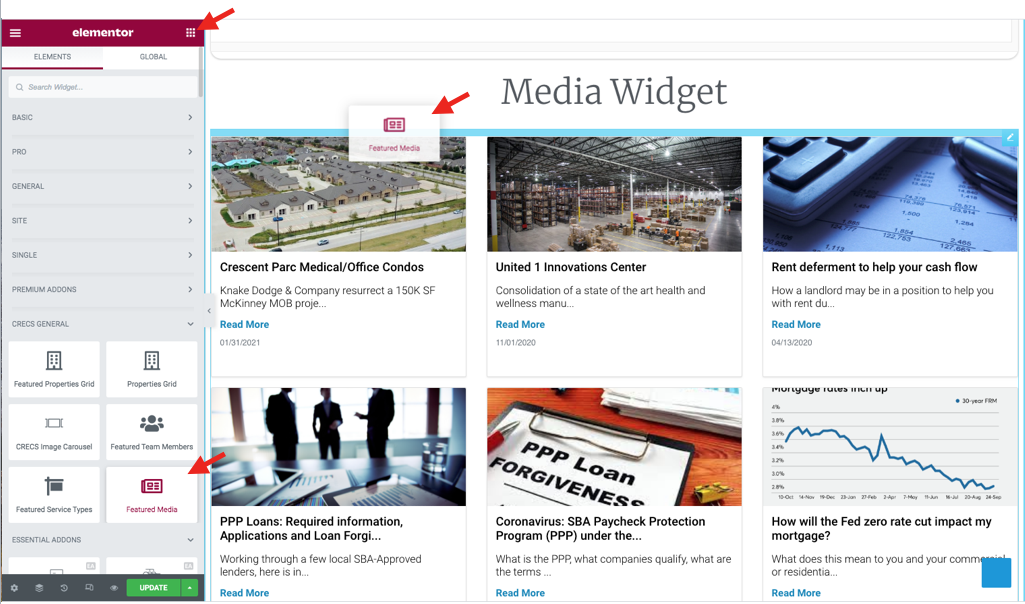
- Next, configure the layout, styling, and other options the Feature Media Widget includes. Once done, click the Update button to publish the changes.
The Media Widget can display in a column grid view or a carousel view based on how you would like it to display on your page or pages.
Grid View
- Click the Edit pen in the top-right corner of the Widget.
- In the Content section of the Edit Featured Media select Grid v1. This will display the Media in a column grid view where the column numbers can be set for each view.
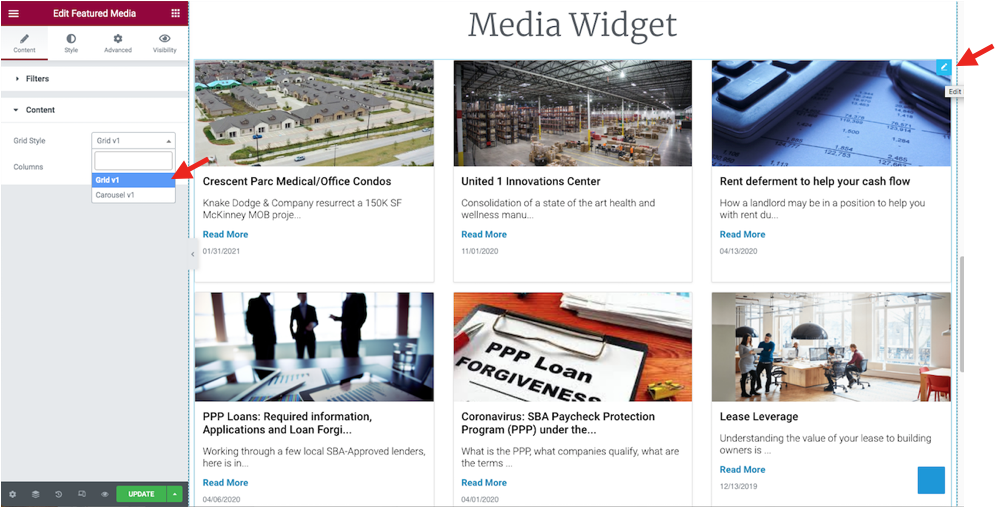
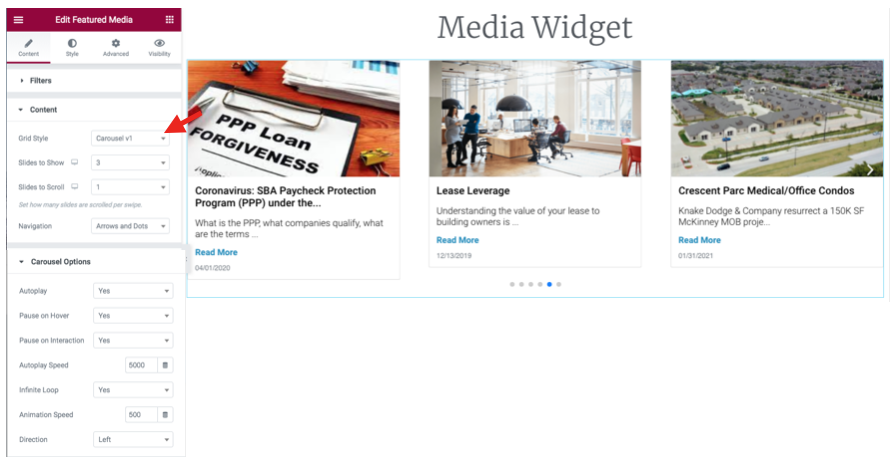
Carousel View
- In the Content section of the Edit Featured Media select Carousel v1. This will display the Media in a carousel view where the column numbers and how it plays can be configured.
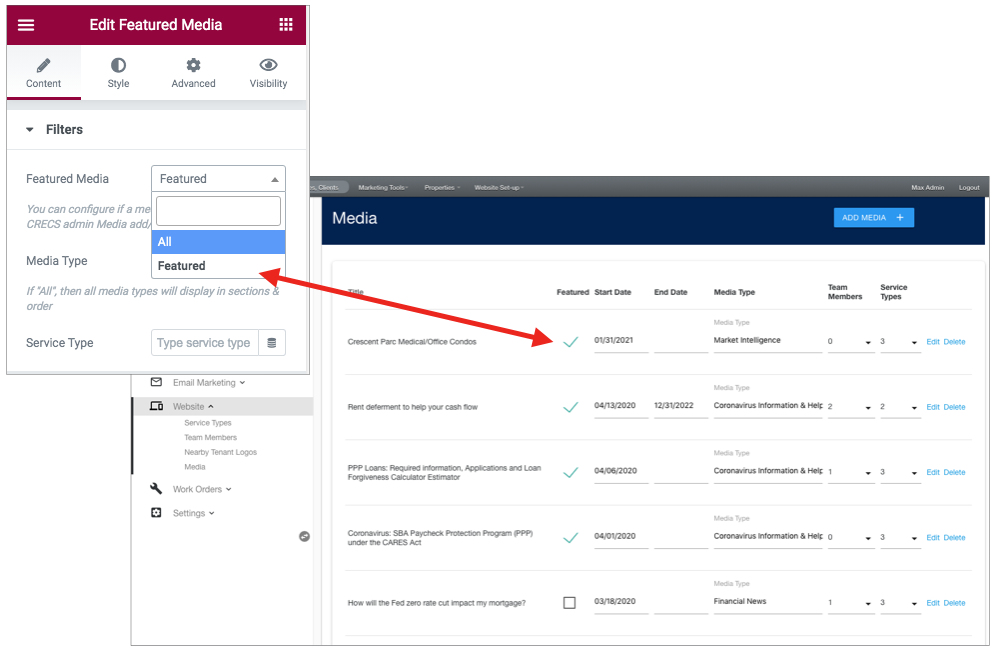
The Media Widget can display Featured Media or All Media.
STEPS
- Click the Edit pen in the top-right corner of the Widget.
- In the Filters section of the Edit Featured Media you can select Featured or ALL.
- Once done, click the Update button to publish the changes.
Configurations:
- “All“displays all Media that fall between the Start and End Dates
- “Featured” displays all Media that have the “Featured” checked and fall between the Start and End Dates
- IMPORTANT: If the End Date is not selected or blank, the media will display indefinitely.
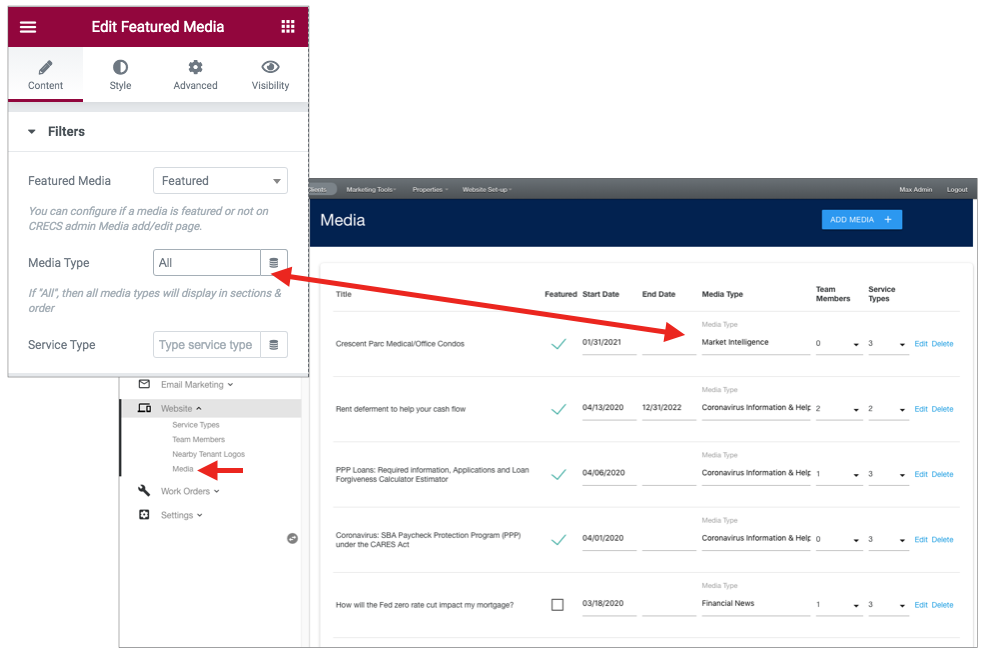
In some cases you may want to display Media only associated with a Media Type. For example, a Media Type could be Recent News, Client Experiences, Latest Transactions, or a Blog. Alternatively you may want to display all Media Types in sections.
STEPS
- Click the Edit pen in the top-right corner of the Widget.
- In the Filters section of the Edit Featured Media in the Media Type box you can enter the name or the Media Type or type ALL. If ALL is enter then the Media will display in Media Type sections.
- Once done, click the Update button to publish the changes.
IMPORTANT:
- Media that fall between the Start and End Dates
- “Featured” displays all Media that have the “Featured” checked and fall between the Start and End Dates
- If the End Date is not selected or blank, the media will display indefinitely.
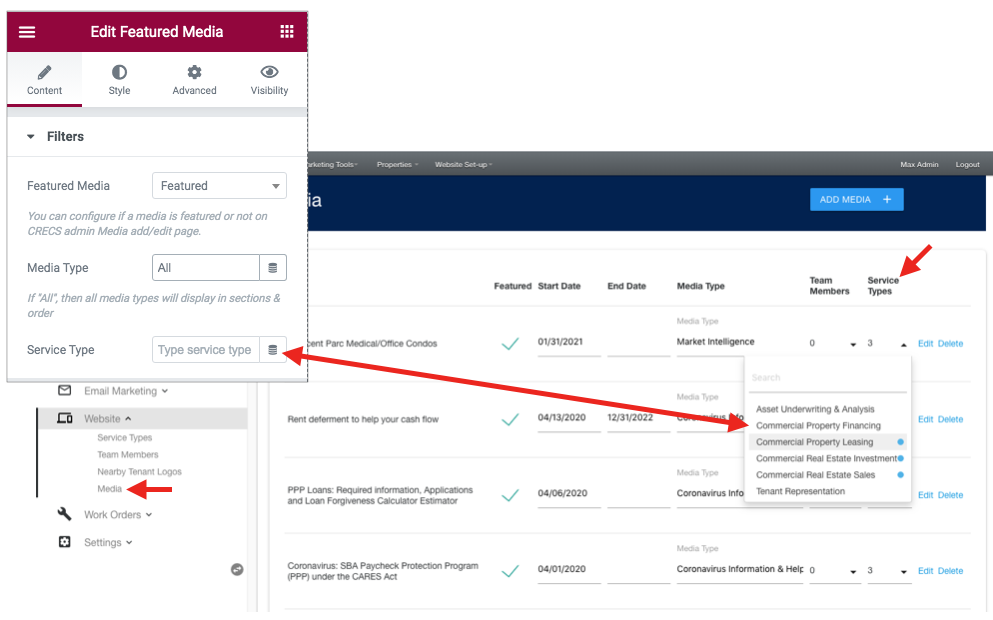
In some cases you may want to display Media only associated with a Service Type. For example, on Service Type pages you only want to display Media assocaited with that Service Type to create more influence on potential customers and clients.
STEPS
- Click the Edit pen in the top-right corner of the Widget.
- In the Filters section of the Edit Featured Media in the Service Type box you can enter the name or the Service Type to apply the filter.
- Once done, click the Update button to publish the changes.
IMPORTANT:
- Media that fall between the Start and End Dates
- “Featured” displays all Media that have the “Featured” checked and fall between the Start and End Dates
- If the End Date is not selected or blank, the media will display indefinitely.
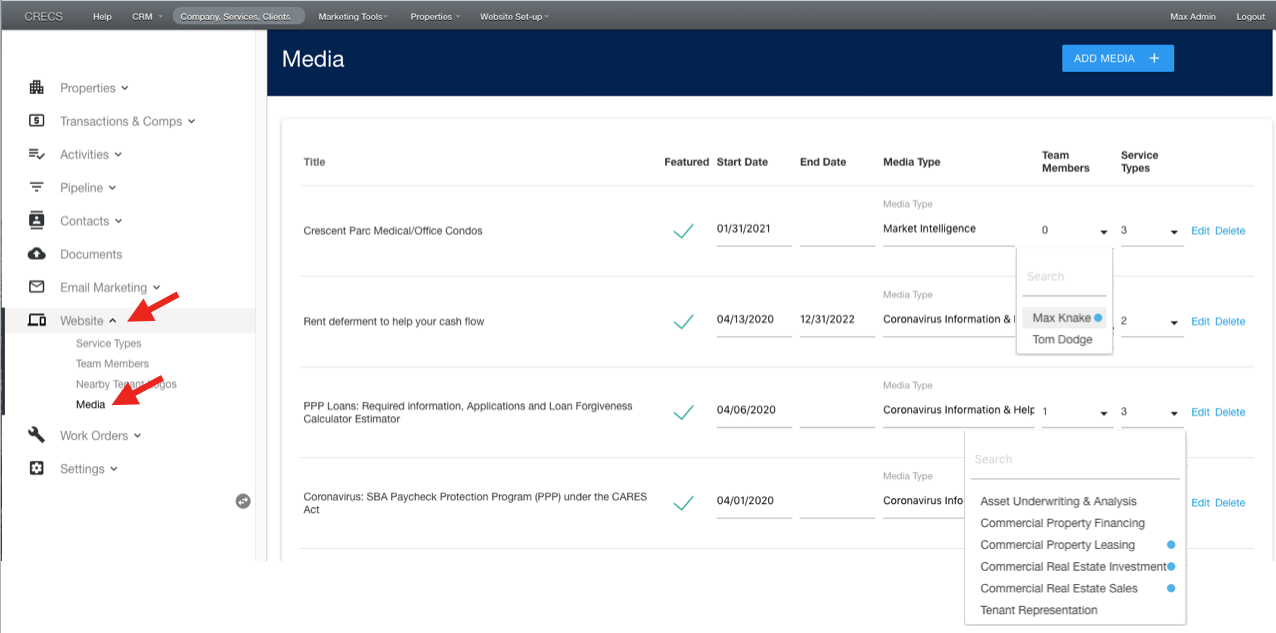
As part of our services we provide our Commercial Real Estate inventory management system. In this system anyone on your team can login (unlimited users) and add/edit/manage media.
STEPS
- Login to you CRE Cloud Solutions Admin
- Goto: Website > Media
- From the Media page most things can be managed easily, but if you need to edit more detailed information, click the “Edit” link.
From the Elementor edit page. The CRE Cloud Solutions Client Logo Widget can be added and configured in a grid or carousel view.
STEPS
- First login to the Word Press Admin from your domain/URL be adding “/wp-admin”
- Once logged into the WP Admin, go to the page you would like to add the Client Logos Widget and add a section.
- Next, click on the Elementor Widget menu (top-right of the Elementor section) and navigate to the CRECS General section.
- Drag and drop the CRECS Image Carousel Widget into the section.
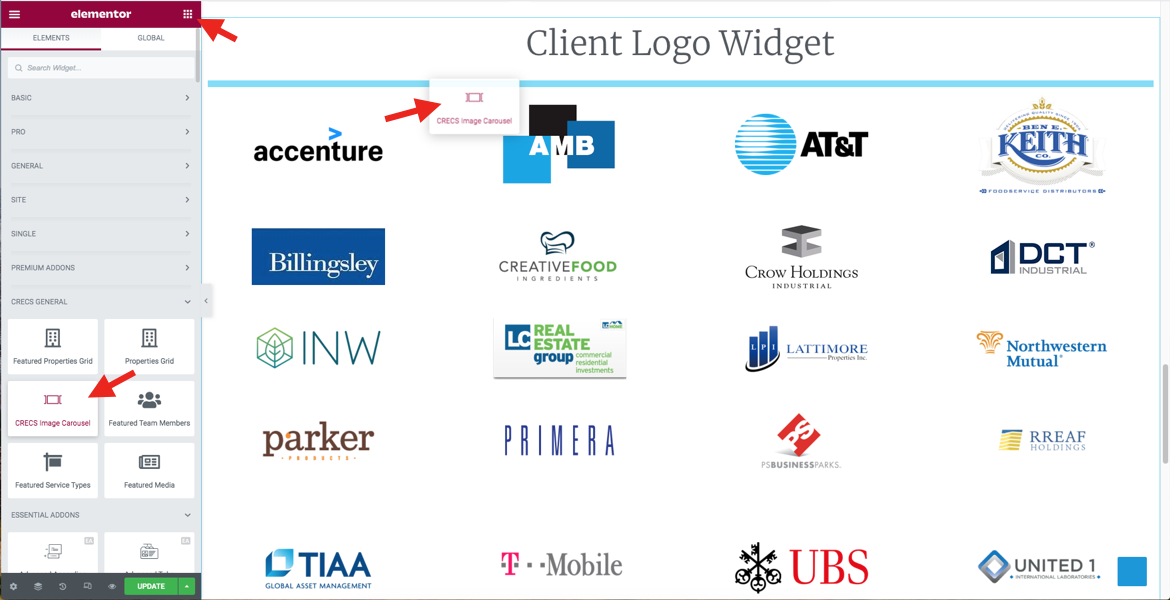
- Next, configure the layout, styling, and other options the CRECS Image Carousel Widget includes. Once done, click the Update button to publish the changes.
The Client Logo Widget can display in a column grid view or a carousel view based on how you would like it to display on your page or pages.
Grid View
- Click the Edit pen in the top-right corner of the Widget.
- In the Content section of the Edit Client Logos select Grid v1. This will display the Client Logos in a column grid view where the column numbers can be set for each view.
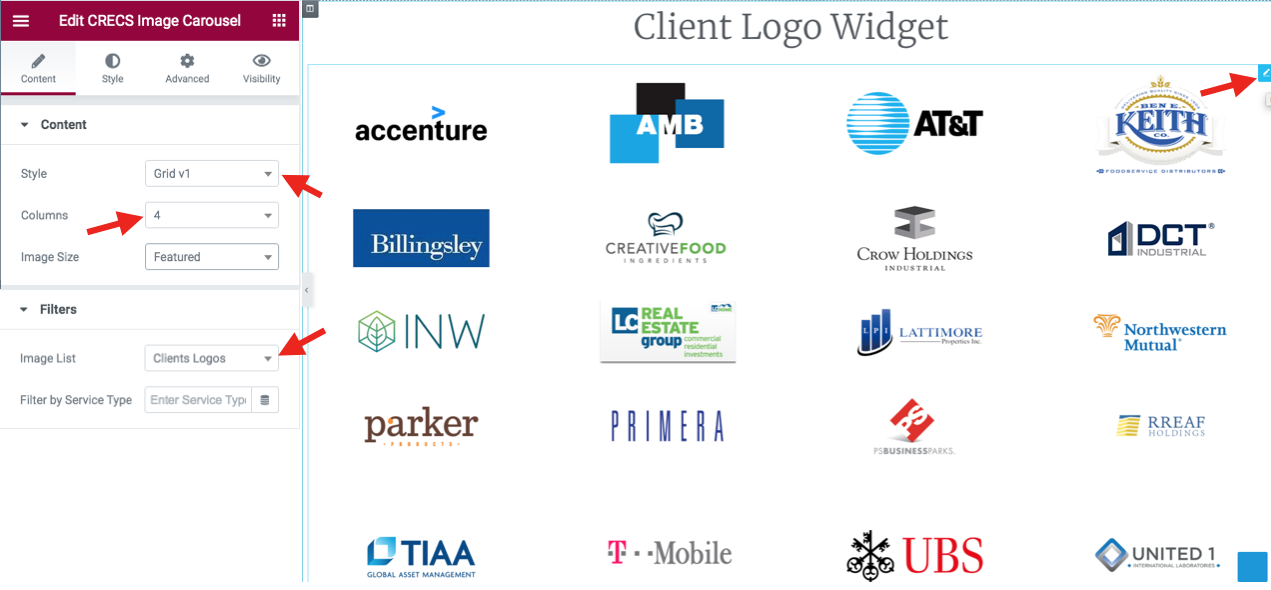
Carousel View
- In the Content section of the Edit Client Logos select Carousel v1. This will display the Media in a carousel view where the column numbers and how it plays can be configured.
![]()
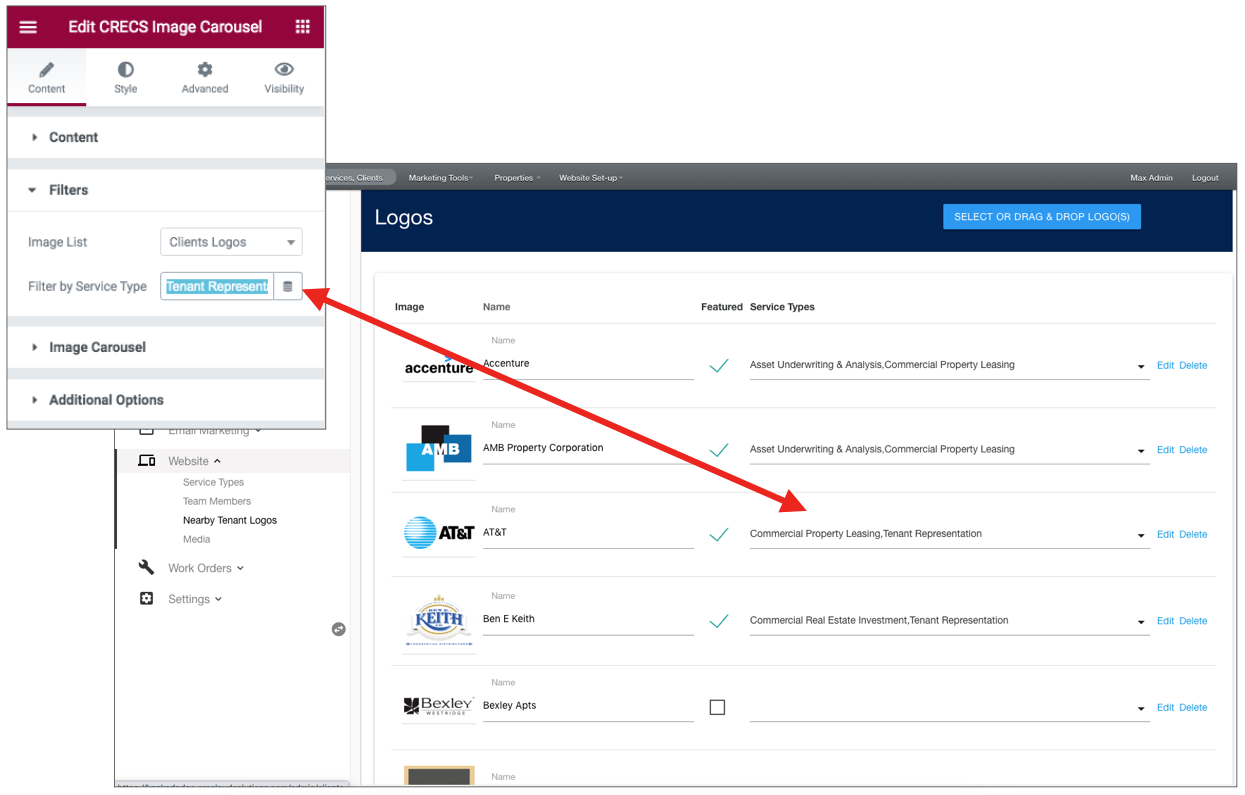
In some cases you may want to display Client Logos only associated with a Service Type. For example, on your Tenant Representation service page you only want to display Client Logos assocaited with that service to create more influence on potential customers and clients.
STEPS
- Click the Edit pen in the top-right corner of the Widget.
- In the Filters section of the Edit Client Logos in the Service Type box you can enter the name or the Service Type to apply the filter.
- Once done, click the Update button to publish the changes.
As part of our services we provide our Commercial Real Estate inventory management system. In this system anyone on your team can login (unlimited users) and add/edit/manage logos.
STEPS
- Login to you CRE Cloud Solutions Admin
- Goto: Website > Nearby Tenant Logos
- From the Logo page most things can be managed easily, but if you need to edit more detailed information, click the “Edit” link.
TIP: You can drag and drop one or more images on the button or drag and drop onto an existing image to change.
![]()
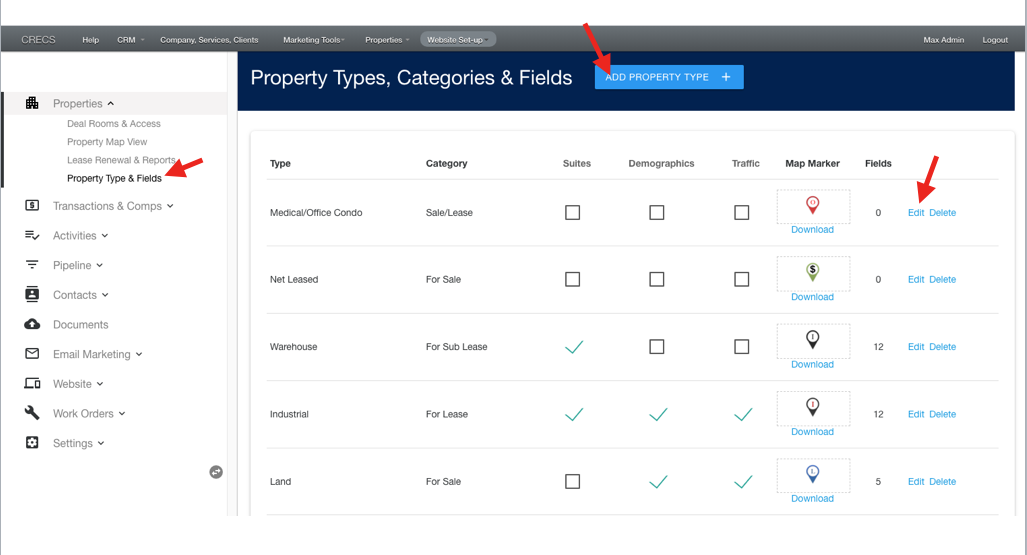
STEPS
- From your CRE Cloud Solutions Admin, navigate to Properties >Property Type & Fields
- From this page you are able to create or edit an existing Property Type including
- Property Type: The type of property
- Category: Sale, lease, sub-lease
- Map Marker: Always use a map marker image with a transparent background.
- Property Fields: These are unique to the property type, which typically differ between property types e.g. an industrial property may have differing fields from a retail, land or office property.